Some time ago I got interested in self-hosting. Since some data is sensitive or may imply some copyright issues while using a third party service, a home server would be required, making a Raspberry Pi the perfect candidate. My setup consists of a Raspberry Pi 4 with a solid state disk (SSD).
Operating System
We will use the AArch64 version of Arch Linux ARM as our operating system. We can follow the official installation guide.
After turning our Raspberry on, we will update with
pacman -Syu
Initial Configuration
From now on, terms between <brackets> will denote parts of commands or files that should be replaced accordingly to our configuration.
We will set up the timezone by using the
timedatectl set-timezone <Time/Zone>command. We can look up which timezones are available by looking the contents under/usr/share/zoneinfo. For example, by executingls /usr/share/zoneinfo/America, we see that we haveAmerica/Santiago.We will update the clock with
timedatectl set-ntp true.We will uncomment the language we will use in the
/etc/locale.genfile, by removing the#character on the corresponding line. We will do this in our favorite text editor (for example, executingnano /etc/locale.genand deleting#from the line containingen_US.UTF-8).- If you haven’t used
nanobefore, you save with Ctrl +O and exit with Ctrl +X .
- If you haven’t used
We will execute
locale-genand thenlocalectl set-locale LANG=<language>.UTF-8, where<language>is the one we picked on the previous step.We will name our server with
hostnamectl set-hostname <name>.We will edit
/etc/hostsso it looks like this:127.0.0.1 localhost.localdomain <name> localhost ::1 localhost.localdomain <name> localhostWe will configure an static IP for our Raspberry by editing the
/etc/systemd/network/eth.network1 file (supposing we are connecting our Raspberry using an Ethernet cable). This will be useful afterwards when we want to make our server accessible from outside our local network.[Match] Name=eth* [Network] Address=<IP Raspberry> Gateway=<IP Router> DNS=208.67.220.220Optionally, we will make our server discoverable by name on our local network, so we can connect to it by using the
<name>we picked before. To do so, we will run the following commands:systemctl enable systemd-resolved.service systemctl start systemd-resolved.serviceAlso optionally, we will enable colors on
pacman, by editing the/etc/pacman.conffile and uncommenting theColorline.
User configuration
We will create an user different from root and the default one, alarm. But first, we will set up sudo, so we can run privileged commands without logging in as root.
- Install
sudowithpacman -S sudo. - Run
EDITOR=nano visudoand uncomment the%wheel ALL=(ALL) ALLline. After saving and closingnano, users on thewheelgroup will have permissions to runsudo.
Now, we will create our new user.
- Run
useradd -m -G wheel <user> - Create its password with
passwd <user> - And last, we will delete the default user with
userdel alarm
Now, we’ll probably want to reboot our Raspberry, if we haven’t done it yet. To do so, run
systemctl reboot
Music Server: Navidrome
Before proceeding, is is a good idea to configure our favorite text editor and point the $EDITOR environment variable to it. To do so, add the following line to your .bashrc file
export EDITOR=<editor>
Now, we will finally install our music server. For this guide, we will install Navidrome2:
sudo pacman -S navidrome
Then, we will run sudoedit /etc/navidrome/navidrome.toml and edit the file like the following snippet
# additional configuration options can be seen at
# https://www.navidrome.org/docs/usage/configuration-options/#available-options
# Address = "localhost"
MusicFolder = "/var/lib/Music"
# CoverArtPriority = "cover.*, folder.*, front.*, embedded"
#BaseURL = ""
#LastFM.ApiKey = ""
#LastFM.Secret = ""
#Spotify.ID = ""
#Spotify.Secret = ""
Start Navidrome with the following commands
sudo systemctl enable navidrome.service
sudo systemctl start navidrome.service
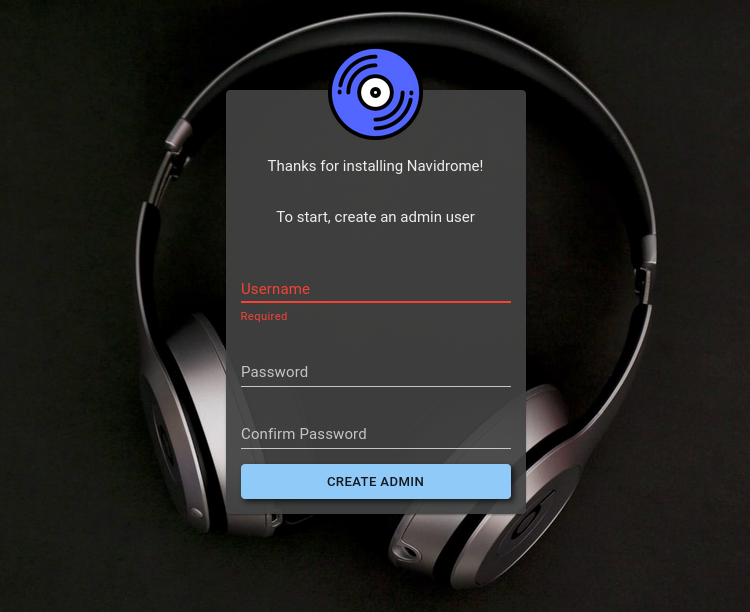
In a we browser, go to http://<Raspberry Ip>:4533 or http://<name>:4533, where we will see a welcome screen which will allow us to create our admin user. After that, we can create the rest of the users we need.
Exposing our server to the internet
On this part of the guide, we will make our server accessible from everywhere in the world. For this, we will need an Internet Service Provider that provides static IPs or to use a Dynamic DNS service.
Dynamic DNS
We will also install an AUR package manager, so we can install packages from the Users Repository. We will install paru3 with the following commands:
sudo pacman -S --needed base-devel
git clone https://aur.archlinux.org/paru-bin.git
cd paru-bin
makepkg -si
We will use Duck DNS4 as a dynamic DNS service. After logging in with one of our accounts (like GitHub’s), we will create a domain with the add domain button. To update the IP within Duck DNS, we will use godns with godns con
paru -S godns
The configuration is located at /etc/conf.d/godns.json and should like this:
{
  "provider": "DuckDNS",
  "password": "",
  "login_token": "<token>",
  "domains": [
    {
      "domain_name": "www.duckdns.org",
      "sub_domains": [ "<domain>" ]
    }
  ],
  "ip_urls": [
    "https://api.ipify.org",
    "https://myip.biturl.top",
    "https://ip4.seeip.org",
    "https://ipecho.net/plain",
    "https://api-ipv4.ip.sb/ip",
    "https://api.ip.sb/ip"
  ],
  "ip_type": "IPv4",
  "interval": 300,
  "resolver": "8.8.8.8",
  "user_agent": "Mozilla/5.0 (Macintosh; Intel Mac OS X 10_10_1) AppleWebKit/537.36 (KHTML, like Gecko) Chrome/38.0.2125.111 Safari/537.36",
  "ip_interface": "eth0",
  "socks5_proxy": "",
  "use_proxy": false,
  "debug_info": false
}
We can find <token> in the home page of Duck DNS after logging in. Finally, we will start the service with
sudo systemctl enable godns.service
sudo systemctl start godns.service
Port Forwarding
Up to now, we made our domain to redirect to the public IP of our network, but our router will block the connections. We need to redirect traffic to our Raspberry. To do this, we need to find the port configuration in the router administration panel and add rules for ports 80 (HTTP) and 443 (HTTPS).

Reverse Proxy
In the previous section, we opened up ports 80 and 443 to the outside world, but Navidrome uses port 4553. To solve this and avoid opening up ports for every new service we want to add, we will use a reverse proxy. In general, most web servers, live Apache, Nginx and others, have the reverse proxy feature, but in this guide we will use Caddy5, because it is lightweight and has built-in HTTPS certificates. We will install it with
sudo pacman -S caddy
We will add the following section to the /etc/caddy/Caddyfile configuration file
navidrome.<dominio>.duckdns.org:443 {
	reverse_proxy localhost:4533
}
Finally, we will start up the service with
sudo systemctl enable caddy.service
sudo systemctl start caddy.service
As a last security measure, we will make the following changes to the /etc/navidrome/navidrome.toml file, so Navidrome can only be accessed through the URL we picked up before:
- # Address = "localhost"
+ Address = "localhost"
After changing the file, restart Navidrome with
sudo systemctl restart navidrome.service
Notes Server: Joplin
We will use docker and docker-compose to install and start the Joplin6 server. We will install them with
sudo pacman -S docker docker-compose
We will add our user to the docker group
sudo usermod -a -G docker <usuario>
and start up the docker service with
sudo systemctl enable docker.service
sudo systemctl start docker.service
Now, we will create a folder to store our configuration file
mkdir joplin-server
cd joplin-server
The docker-compose.yml file should look like this
version: '3'
services:
  db:
    restart: unless-stopped
    image: postgres:14
    ports:
      - "5432:5432"
    volumes:
      - /foo/bar/joplin-data:/var/lib/postgresql/data
    environment:
      - POSTGRES_PASSWORD=<password>
      - POSTGRES_USER=joplin
      - POSTGRES_DB=joplin
  app:
    environment:
      - APP_BASE_URL=https://joplin.<domain>.duckdns.org/
      - APP_PORT=22300
      - POSTGRES_PASSWORD=<password>
      - POSTGRES_DATABASE=joplin
      - POSTGRES_USER=joplin
      - POSTGRES_PORT=5432
      - POSTGRES_HOST=db
      - DB_CLIENT=pg
    restart: unless-stopped
    image: etechonomy/joplin-server:latest
    ports:
      - "22300:22300"
    depends_on:
      - db
To start the service, use the following command
docker compose up -d
Add the following section to the /etc/caddy/Caddyfile file
joplin.<domain>.duckdns.org:443 {
	reverse_proxy localhost:22300
}
Now, restart Caddy and access the Joplin server. As your first action, log in with the admin@localhost and admin credentials and change them. Then create your users so you can start your notes synchronization.